Make a Revolving Pencil Caddy with Lift-out Cups
I love using colored pencils, but after rummaging through boxes looking for a certain color, having cardboard holders flop over, and grabbing at pencils steamrolling off my table, I knew there had to be a better way.
Quick and Easy
So in less time than it took me to locate sky blue, I made a revolving caddy to organize my colored pencils. Read on to learn how I made it and to discover why this one might be just the right thing for you as well.
In addition to the materials below, you’ll need a scissors, a ruler, and a pencil or Sharpie-like pen.
Materials
A minimum 10 to 12 in. diameter utility turntable, such as Rubbermaid’s, from Target, Amazon, or Walmart for about $15.00.
16 or 17 same-size plastic drinking cups, approx. 5-1/2 inches tall. Make sure they stack. I bought five to a package at the Dollar Store.*
E6000 or Goop type glue. (Elmer’s type white glue doesn’t adhere well to plastic.)
The cardboard tube from a roll of paper towels, or two tubes from a couple of rolls of toilet paper.
Total Cost: Under $20. depending on brands
Instructions
1. Arrange approximately seven plastic drinking cups in a circle around the edges of the turntable and place one cup in the center. Sizes may vary; make sure they all fit right up to the lip of the turntable. Color of the cups is unimportant.
2. Glue the bottoms of the cups onto the turntable using a generous amount of glue. Let dry thoroughly; it may take several hours. NOTE: If your cups have a hollowed out bottom. Make sure you put enough glue around the edges that touch the surface of the turntable so the cups adhere well.
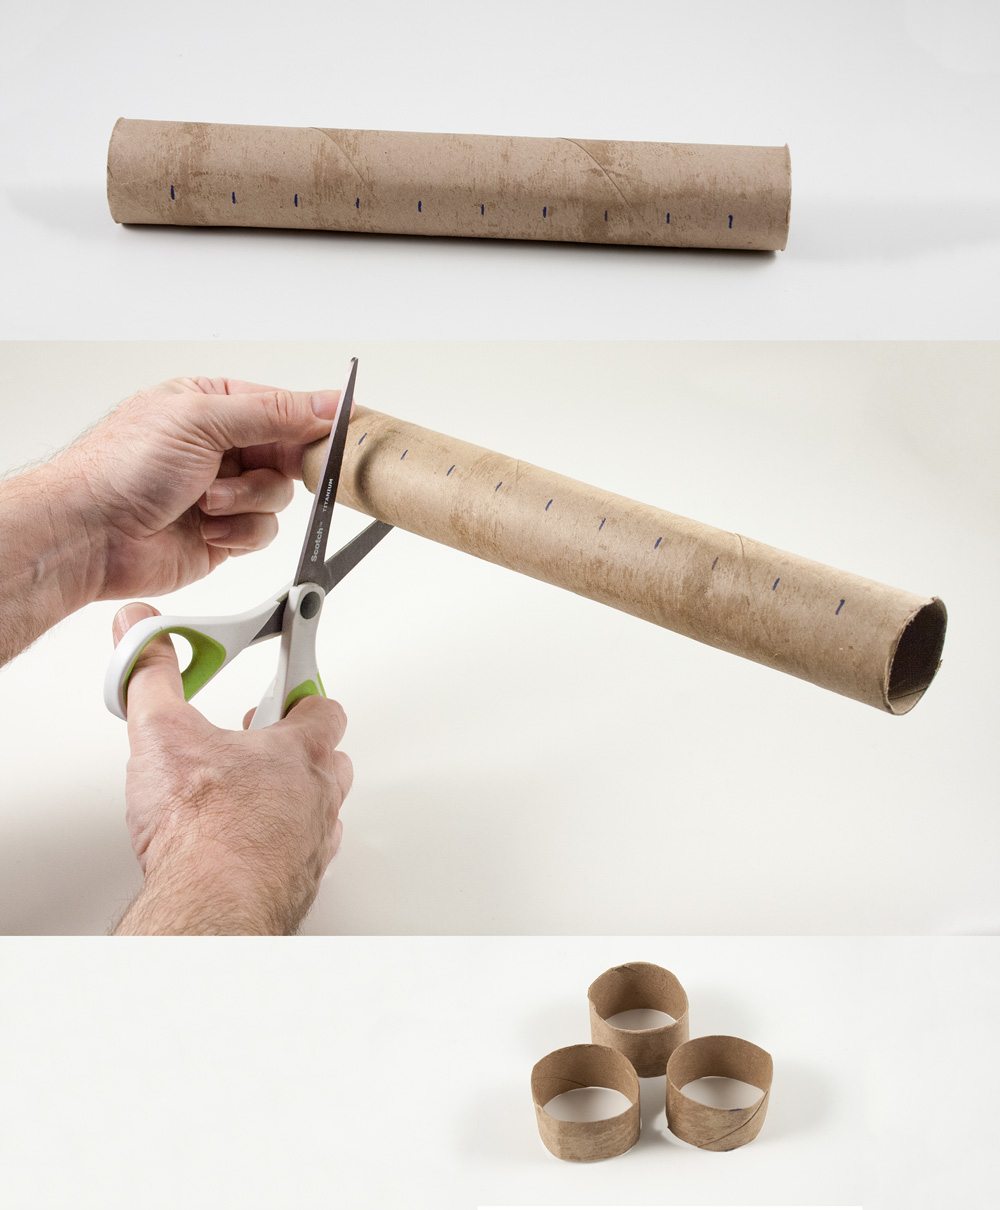
3. While the cups are drying, measure 1-inch marks on the paper tube(s).
4. Cut the tube into 1-inch segments, flattening out the tube as you go to cut it more easily. Reshape the segments into “rings” again.
5. When the glue is dry, drop the cardboard rings into the cups that are glued onto the turntable. The rings should sit edge-on at the bottom.
6. Insert a second cup into each glued-on cup. I stacked three in the center for easier access.
7. Fill the cups with colored pencils, and you’re done!
Handy Access
The key to this colored pencil caddy is its ease of use. When you're looking for a colored pencil, especially a shorter one, simply lift out the cup to find it. Replace when finished. The cardboard rings prevent the top cup from sticking to the bottom one.
* The plastic cups I bought have DEHP in them that make them unsafe to drink from. DEHP can leach from the plastic when exposed to liquids. I am using the cups with no intention to drink from them. If you have any kind of aversion to this, use a different set of cups that you’re more comfortable with.
*
Organizing Colored Pencils
Here's a system that keeps your colors visible and close at hand.
Hard and Waxy Pencils
I combine both hard (such as Verithin) and soft lead pencils (such as Prismacolor) in my caddy sections. I group both together because it's the color that matters most to me, and I use both pencil types on every piece I do. The hard lead works for small details and the waxy lead is good for filling large areas and for layering over the hard lead areas.
I do not keep watercolor and pastel pencils in this caddy because I use them separately with other materials.
Group Colors into Families
It's easier to find colors when you keep color families in rainbow order, such as reds/oranges, pinks, purples, blues, greens, yellows, and browns around the edge, and cool neutrals in the center.
Reds/Oranges – include colors such as vermillion, coral, orange, dark magenta, crimson, burgundy, and other red-based tones.
Pinks – Although pink is light red, I separate pinks from the red family because there are so many shades. Include colors such as light magenta, pale pink, bright pink, mauve, and peachy colors.
Purples – include colors such as dark purple, lavender, orchid, blue-purple, and violet tones.
Blues – include colors such as pale blue, turquoise blue, lavender-blue, bright blue, cobalt, indigo, ultramarine, and other blue tones.
Greens – include colors such as olive, pale green, bright green, dark green, grass green, aqua, turquoise-green, and yellow-green.
Yellows – include colors such as ochre, pale yellow, bright yellow, golden yellow, yellow-orange, and cream colors.
Browns – Browns are warm neutrals. Include colors such as sienna, umber, beige, tan, taupe, terra cotta, khaki, and warm earth tones.
Cool Neutrals – Put this group in the center section. Include colors such as black, white, all shades of gray, and blender pencils.
Half & Half Colors
There are colors that could fit in either of two groups, such as yellow-green. Is it more yellow? Or more green? Life is short; pick one and move on.
Metallic Colors
If you work with metallic colors, consider putting gold and bronze in the brown group because they're warm neutrals. Group silver and pearl white with cool neutrals.
*
Is this the pencil caddy you’ve been waiting for? Or, do you have a better way of organizing your pencils? Let me know your thoughts. Start a discussion in the comments.